Screenwriter lets you work on one project at a time. When you start
Screenwriter first the menu
changes to the following picture:
![]()
Now you can chose "New" or "Open" from the "File"
menu. If you chose "New" you start with a new
Screenwriter document and your screen changes to this:
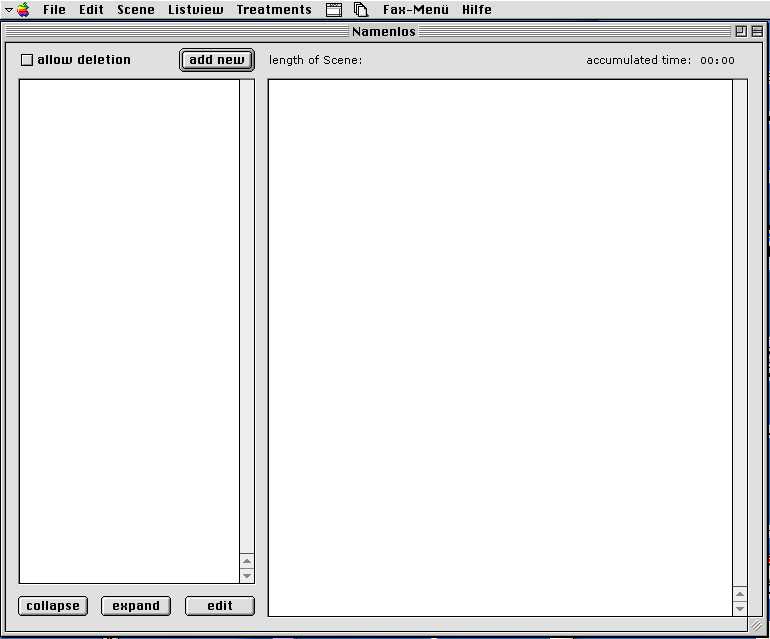
This the main window (listview) of an empty script. On the left you
have a kind of outlining box.
You can populate this box with three different kind of things:
1. Act markers
You can use them to mark a certain point in your
script: the beginning of an act, plot point, ect.
They can have description (of the act, plot point
or whatever you use them for).
I think act markers should be used to give the script
a rough structure.
In the list view (outline box) their title text
is all capitals and bold.
Note that act markers can´t be placed in a
sequence.
2. Sequences
They should be used to give the script a
finer structure. They can have descriptions too.
And you can fill them with the stuff your script
is made off: scenes.
Sequences can be collapsed (the contained scenes
are hidden) or expanded (contained
scenes are shown). Scenes which are in a sequence
have a bullet on the left.
If you drag a sequence to another place in the list
the contained scenes are dragged too
and stay in the sequence.
If a sequence is expanded the last element at it´s
bottom is: " - - - " (end of sequence)
In the list view (outline box) their title text
is bold and they are indented a bit.
Note that sequences can´t be placed in another
sequence.
3. Scenes
Scenes are... well at least you should know if you
want to write a script. They contain the
description of the action, shots, characters, parenthesis,
dialog and transitions.
They are the beats your screenplay is made off.
Act markers and sequences are only helpers
for the script structure and your thoughts. The
description content of act markers and sequences
won´t show up in your formatted script. But
you can print them as a kind of treatment.
In the list view (outline box) scenes are all capitals
and plain and they are indented a bit.
Note that scenes can be placed in sequences.
You create a new act marker, sequence or scene with:
"Add New..." menu item in the "Scene" menu or the "add
new" button on the top of the main window.
The following picture shows the upcoming dialog:
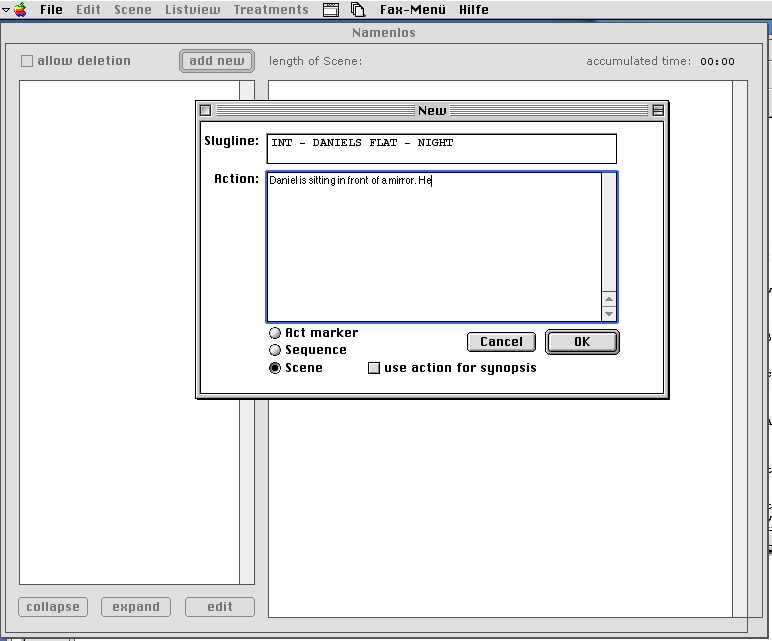
Choose first what kind of item you want to generate (radio buttons on
the bottom of the dialog).
In the slugline field you write the title and in the action field you
write the description.
Note that you can change or fill in everything later in the scene view
(or act markers and sequence view).
But the slugline filed must have something filled in, otherwise
you won´t get a new item in the list.
Scenes, act markers and sequences can hold synopsis information about
their content.
This is most important for scenes, because as you will later see you
can make a "treatment of beats".
That is your script with all written scenes but you only use a short
description what happens in the
scene (no dialog, shots, etc.).
That´s why there is the option box "use action for synopsis".
Everything what is written in the action
field is used then for the synopsis too. But you can fill in the synopsis
later in the scene view either.
If you would have populated your outlining box with a few act markers,
sequences and scenes
(which you can achieve over the "Add New..." menu item in the
"Scene" menu or the "add new" button
on the top of the main window) it could look like this:
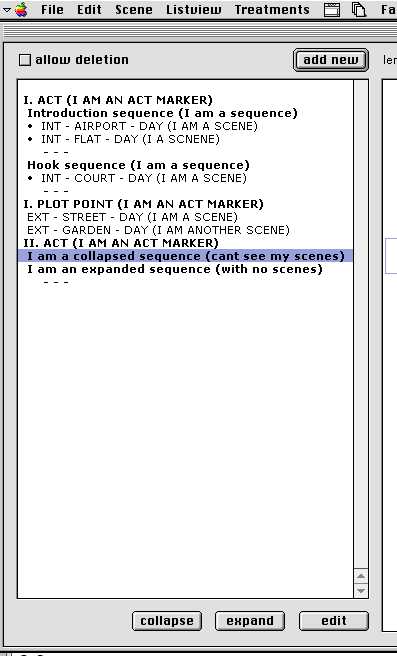
or this:
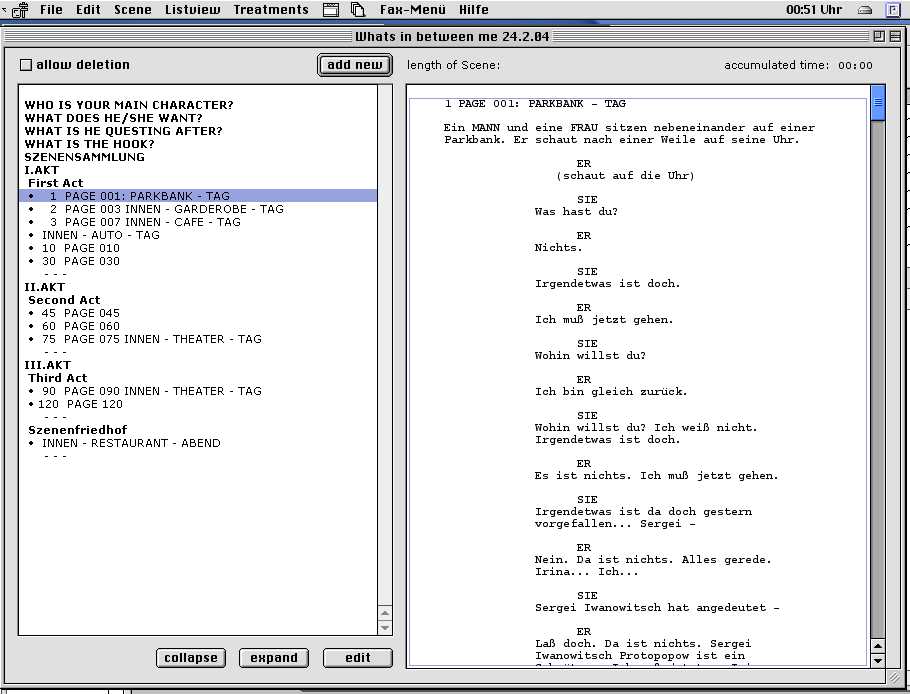
In the field on the right side is the script (the formatted text
which will be printed later and which is your screenplay or
treatment of the beats or four pages treatment or whatever you have
chosen under the treatments menu.)
If you select an item in the list view and doubleclick or chose the
"edit" button or "Edit..." from the "Scene" menu
your screen window will change depending on what item is selected:
If it´s a scene it will change to the scene view:
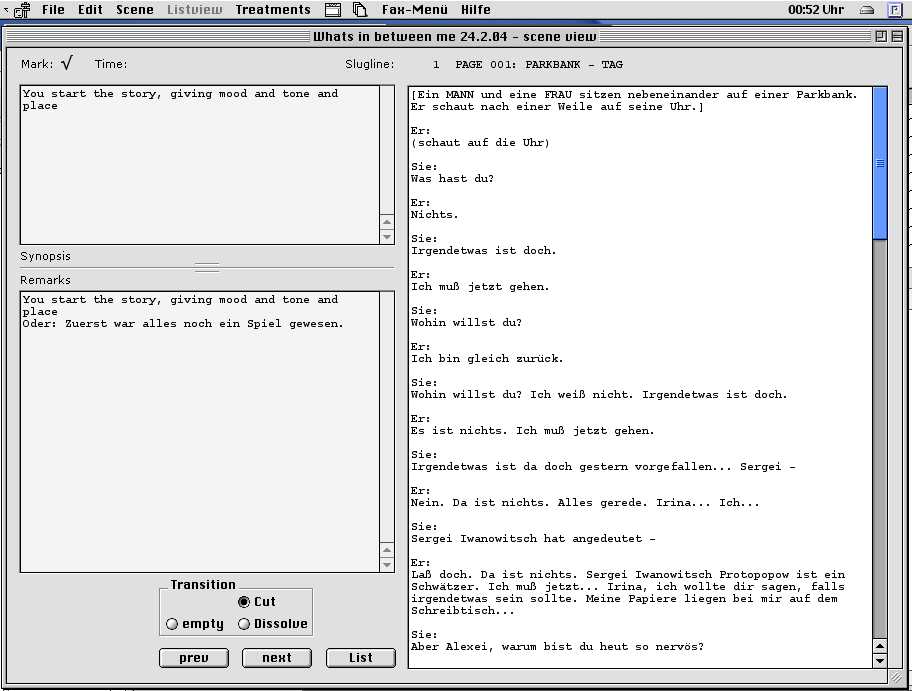
Now you can see three fields (two gray on the left and one white on
the right).
On the left are the synopsis and the remarks field. Their names are
self explanatory.
In the screenshot above the synopsis field should contain a comprehensive
description of
what happens in the scene (It´s my laziness that it has the same
text as the remark field).
In the remark field you can write whatever you want: e.g. the date
you last worked on,
what you want to do to improve the scene, what doesn´t work,
etc.
You can change the size of the fields by clicking and dragging the
separator.
In the field on the right is the unformatted text of the scene.
The field holds the text with formatting cues.
You need the formatting cues to tell the app which text should be treated
as action text, shot, character name,
parenthesis and dialog text.
The cue for the description of action and shots are []
(after the closing bracket must be a return, a new line or
whatever you call it. After the other formatting cues must be a new
line either)
Everything what is in the brackets is treated as action or shot.
The cue for character names are: : (and a return directly
after that. If you want to have a : in your text and don´t
want it treated as a formatting cue don´t put a new line directly
after it, insert at least a blank space)
Everything what stays before the : and in the same line is treated
as character name.
The cue for parenthesis is: () (after the closing bracket
must be a return. if you want to use () in your text and
don´t want it treated as a formatting cue don´t put a new
line directly after it, insert at least a blank space)
Pharanthesis are short descriptions in conjunction with characters
(and their dialog) which gives advises to the
director or actor how to play these certain lines.
Everything which is not enclosed in formatting cues is treated as dialog.
Note that only this certain field in the scene view is capable of compiling
formatting cues in a screenplay format.
The synopsis and remarks field or the fields in the act marker and
sequence view act as normal text fields.
They can´t compile cues in formatted text.
The compiled text shows up in the main window on the right of the list
(outline box). You can compare the
two screenshots above for the difference of the unformatted text in
the scene view and the formatted text
in the main view. The right field in the main view holds all formatted
text of all the selected scenes you have
chosen. You can scroll through it and the scenes are selected by screenwriter
in the list on the left.
There are a few other items in the scene view:
1. Transition radio button at the bottom
You can chose whether you want to use a transition and
what transition should appear at the end of this
particular scene.
2. Navigation buttons: prev, next and List
Use them to navigate to the previous or next entry
(scene, act marker or sequence).
The List button brings you back to the main window.
3. At the scene window top are from left to right: Mark:, Time:
and Slugline:
You can click right from the text Mark: to
mark or unmark the scene.
You can click right from the text Time: (or
choose "Timestamp" from the menu "Scene") to enter the
length of the scene in minutes and seconds.
You can click right from the text Slugline:
to enter a scenenumber manually.
If you click more in the right from the text Slugline:
you
can change the title of you scene.
If you edit an act marker or a sequence the window changes to this:

Which is similar to the scene view but has no formatting (cues) and
less function (no transitions, no mark/unmark, no timestamp).
This act marker as you can see consists only of it´s title and
has no description, synopsis or remarks yet.
Now I will show you the different menus:
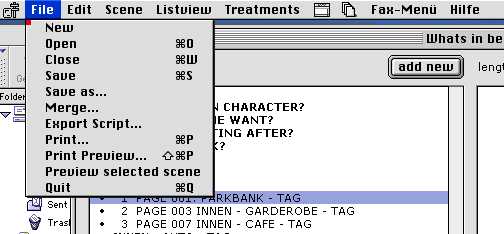
The file menu. The first entry what maybe is not obvious is "Merge".
Merge means you load another screenplay file which is appended
to the one which is open.
If you chose Export Script... all selected scenes will be exported
without formatting as a text file.
Exporting is not possible for act markers and sequences.
If you print there is the possibility to use print preview first (see
how your script looks formatted).
If you have chosen "Production script" under the "Treatments"
menu then the menu entry
"Preview selected scene" will be visible. If you chose that
you can print the selected scene from the preview window.
Next menu is:
Note that Undo and Redo is not related to anything you
do in the list (outline box).
List changes are not undoable.
Undo / Redo is only related to text entries.
Next:
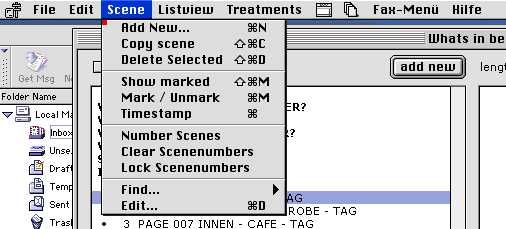
Add New... - add a new item to the list (Act marker, Sequence
or Scene).
Copy scene - copies a scene in the list (all fields are copied)
and a copy is added to the scenes name.
Delete Selected - deletes an item (Act marker, Sequence or Scene)
in the list. The allow deletion checkbox in the main window
must be checked. No undo is possible.
Show marked - if it is checked a checkbox shows up in front
of each scene item in the list, where you can see the
checked / unchecked status. Clicking a scene with a checkbox, toggles
it´s checked / unchecked status. But may be it is
better to navigate through the list with the up and down arrowkeys
and Mark / Unmark the scenes with menu or the
shortcut command - M.
Timestamp - lets you add a timelength information to the selected
scene in the main-window (if you edit a scene it is
possible in the scene - view too)
Number Scenes - is only possible in the main-window. If no row
in the list is selected, numbering starts from the first scene,
otherwise it starts from the selected item. You can specify the number
it should start with. If you insert scenes in the production
process later on when the script already had locked scenenumbers you
should number the new scenes "by hand" in the
scene-view like this (use letters lie a, b, c...): e.g. the scene before
inserted scene has number 56, the scene after it
has the number 57, the inserted scene gets the number 56b.
Clear Scenenumbers - lets you clear the scenenumbers (if the
numbers are not locked already) from the selected row on or
all if nothing is selected.
Lock Scenenumbers - locks the scenenumbers. Now it´s not
so easy anymore to accidentally delete or change the scenenumbers.
You have to unlock them first.
Find... (and replace) - opens a find dialog which has the expected
functions. You can specify where you want to look for it. If
Treatment is selected in the dialog Screenwriter searches for
the string in the treatment, which is specified under
the Treatments menu. If it finds something it jumps directly
in the edit mode to the selected item (Scene, Act marker or Sequence).
Edit... - schwitches to the appropriate window (Scene - view
or Act Marker - Sequence view) for the selected line to make editing
possible.
Synopsis - toggles the visibility of the synopsis and remark
field in the main window.
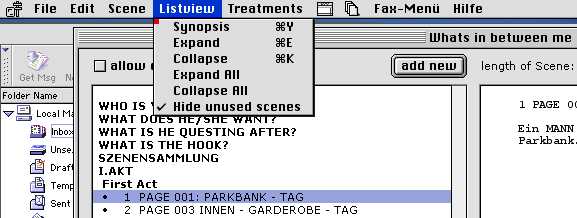
Expand - expands the selected row if it´s a collapsed
sequence.
Collapse - collapses the selected row if it´s a expanded
sequence.
Expand All - expands all sequences
Collapse All - collapses all sequences
Hide unused scenes - hides all scene in the listbox which are
excluded in the treatments menu
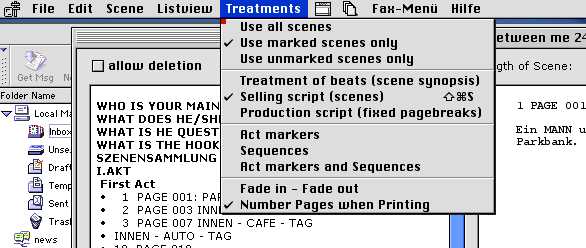
Use all scenes - uses all scenes for a treatment, whether they´re
marked or unmarked (if one of the following
treatments are selected: Treatment of beats, Selling script
or Production Script)
Use marked scenes only - uses only the marked scenes for a treatment.
Use unmarked scenes only - uses only the unmarked scenes for
a treatment.
Treatment of beats - compiles a treatment of the scene beats
(uses the text, which is stored synopsis field of
the selected scenes (all, marked or unmarked)
Selling script - compiles a screenplay script with all the formatted
text (like: action, character, parenthesis,
dialog, shots and transitions) of all selected scenes (all, marked
or unmarked). The selling script is formatted
without extra pagebreaks, which is appropriate for a selling script.
Production script - compiles a production script of all selected
scenes. Every scene starts with a new pages.
Here it is possible to insert or change scenes in the production cycle,
without loosing pagination and being
forced to print out the whole script again.
Act markers - shows a compilation of the text which is entered
in all act markers main fields.
Sequences - shows a compilation of the text which is entered
in all sequences main fields.
Act markers and Sequences - - shows a compilation of the
text which is entered in all act markers and
sequences main fields.
Fade in - Fade out - uses the cues Fade in and Fade
out at the beginning and end of a selling script.
Number Pages when Printing - if checked places pagenumbers on
top of the pages of the chosen treatment when
printing or printing preview.